Contact Support@everlogic.com to set-up your FREE Demo.
Click here to view the WebManager Walkthrough
- Inventory: Inventory will be imported from your website; tracking tools are available.
- Create Vehicle Inventory and add it to Staging Inventory - Expand Inventory then click Add Vehicle, manually add VIN or Stock Number and click Submit.

-
-
- WebManager decodes the VIN and will auto-populate the vehicle details, year, Make, Model, standard and optional features, etc., other specifics can be manually keyed / selected.
-

- Mobile App: Most all functions are available on your mobile device, including the Driver’s License Scanner, Clients, Inventory, Text, Email, Appointments, Tasks, Scan Documents.
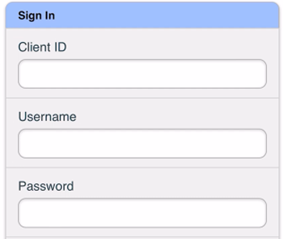
- Login using your WebManager Client ID, Username and Password.
-
- Enter Inventory
- Access the Home Screen, and click Add Vehicle
- Enter Inventory
![]()
-
-
- Include Vehicle Type / Lot / Stock #
-

-
-
- Type VIN or click Scan VIN to use phone camera to scan the VIN
-

-
-
- Adjust fields, as necessary
-

-
-
- Add Photos, new or existing
-


- Inventory Sections
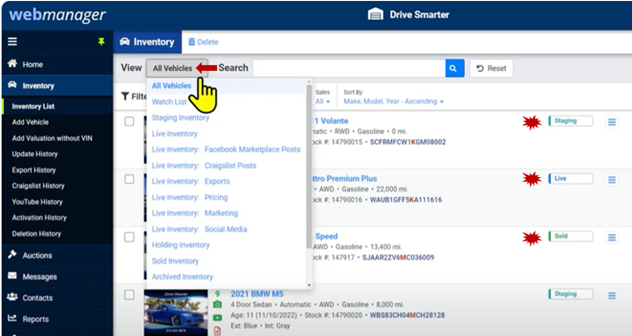
- Expand Inventory then click Inventory List

- Click drop-down to see the different views of your Inventory List
-
- Statuses
- Staging
- Live
- Sold
- Statuses
-
-
-
- The first step is Vehicle Staging, it prepares your vehicles for your website; add photos, edit vehicle information and adjust pricing, before it is posted to your website
-
-

-
-
-
- Then the vehicle can be marked as Live Inventory, to post on your website
-
-

-
-
- The vehicle can be marked as Holding Inventory, to prevent it from posting on your website
-
-

-
-
- Sold Inventory will display all units you have marked as “Sold”
- A sold unit is removed from the file sent by EverLogic and marked as "Sold" in WebManager.
- Sold Inventory will display all units you have marked as “Sold”
-
-

- Archived Inventory will not display on your website, automatically deleted after the timeframe set forth in your settings

- Vehicle Details
- Click the link to view the vehicle details

-
- Tabs are available to view additional details

-
- Photos: You can select up to 100 photos to upload.

-
-
-
- Upload / Edit photos
-
-

-
-
-
- Select photos to add
- Rearrange and add descriptions as necessary, then click Upload
-
-

- Activating Vehicles: Activated Vehicles will display on your website.
- Errors & Warnings will show on your Inventory List. Click the Errors or Warnings Links to display the message. Warnings will not prevent you from activating the vehicle, however, an Error will.


-
-
-
- Select the Vehicle and click the Activate Button.
-
-

-
-
-
- Changes cannot be made once the vehicle is activated. Contact Support for changes after the vehicle has been activated.
-
-

- Imports & Exports
- Exports: Select an Enabled Export Sites or click to add New Export Sites. Export Settings can be changed, including the export times.


-
-
- Select the vehicles to be exported. Once selected the green boxes will display the selected Export Sites. Gray boxes indicate the vehicle has not been selected for that Export Site.
-

EverLogic sends the information below to WebManager;
- Dealer ID
- Stock Num
- Vehicle Type
- Type
- Year
- Make
- Model
- VIN
- Mileage
- Body Style
- Fuel
- Dealer Cost
- Asking
- Transmission
- Doors
- Engine
- Photos Modified
- Photos
Click here to view the WebManager Walkthrough
Contact Support@everlogic.com to set-up your FREE Demo.
Related Articles
WebManager Integration with EverLogic