
EverLogic's customer search tool is a robust part of our built-in CRM with options for managing and organizing customer data, including adding new customers, exporting data, and customizing views.
1. Navigate to Sales Operation and select Search Customer
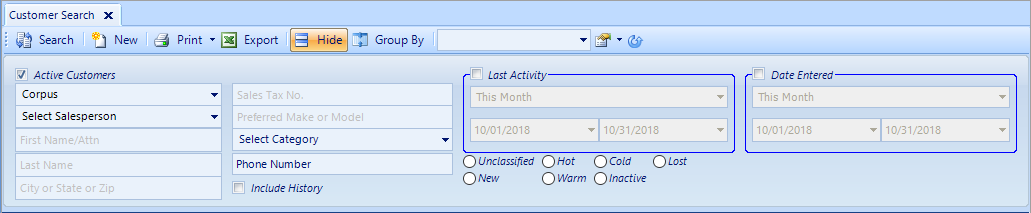
2. Key filter criteria :
-
- Active Customers – selected by default – deselect to include inactive customers
- Location – will default to your selected location
- Salesperson – includes salespeople from all locations
- First Name – all or portion of customer first name
- Last Name – all or portion of customer last name or company name
- City or State or ZIP – enter any one of the three
- Sales Tax No. -
- Preferred Make or Model – if one is keyed in the Customer Wish List
- Select Category – part price category
- Phone Number – only home phone number is searched
- Include History – select if you want to include history
- Last Activity – displays Customers who have activity during the selected date range
- Date Entered – displays Customers who were entered during the selected date range
- Prospect Status – select one status to filter your customer selection
3. Click the Search Button to display search results

4. Toolbar options include the following:

-
- New – add a new customer
- Print – print the customer data that was loaded
- Export – export the data that was loaded to an Excel file, to save on your local drive
- Hide / Show – will hide / show the filter criteria
- Group By – allows you to drag a column header for filtering presented list
- FlexView – select and save a specified view of the list
- Refresh – clears any filter criteria currently selected
Related Articles:
Customer Association "Co-Customer"
How to Locate / Re-activate a Deleted Customer
Create Customer Prospecting Statuses
Using Customer Prospecting Statuses
Moving a Deposit Between Customer Accounts
Update Customer's Address Zip Code, using the "plus-four code"
Customer Follow-Up Reminders Set-up
Changing Customer Prospecting Statuses Follow-up Timelines